To see this full post visit here
Jwt Token with Cookie Authentication in Asp.Net Core
Please browse here for the article
Entity Framework with Azure Function
Azure Functions is a solution for easily running small pieces of code, or “functions,” in the cloud. You can write just the code you need for the problem at hand, without worrying about a whole application or the infrastructure to run it. It is a great tools for many of the analytical and iot related services in azure like iot hub, event hub, stream analytics, notification hub etc. You can write azure function solution in different language like C#, Javascript. If you write the function using C# then you may noticed that you can write everything using C# like normally you write in visual studio. Every library of .Net framework and also nuget packages are available into it, this is big potential to work with it. But at the same time you may noticed that the solution its used is not like visual studio solution as usual. Files are not .cs file they are .csx file. So things are different here to configure and use everything.
In this blog post I will try to make you understand how can you use entity framework with C# code. So lets get started.
At first lets create a Function App at azure. Sign in to the portal. Select New > Compute > Function App

It will open the function app blade.
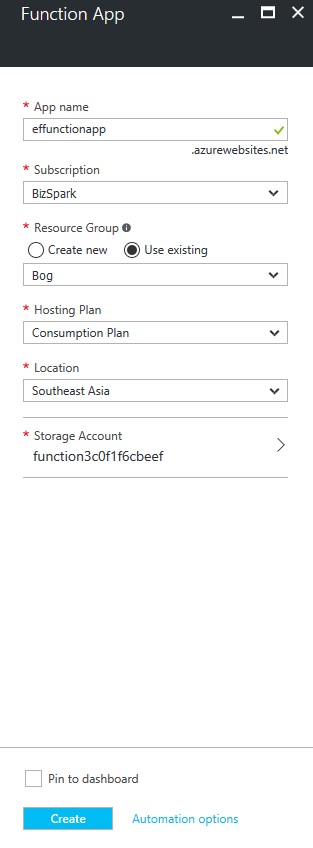
- In App name give a name for the function app, which will be in the app domain or url
- Select your Subscription.
- In Resource Group section either you can create a new resource group or you can use existing one that you have created earlier. Resource group actually grouped your related service and solution in one place.
- Select a nearby data center location.
- You can create or use existing storage account. Or simply use the default one. I have used default one for simplicity.
Now open newly created Function App. Press New Function in the upper left corner

This will open the function creation window. In this blog post I mainly focus on using entity framework with Function App so I am creating a Manual Trigger function using CSharp

Provide a name for the function and press create button this will create a manual trigger function.
Test the newly created function using upper right corner Test menu

Now we need to connect a database with this unction app. If you don’t know how to create a database in azure then visit this azure doc.
From the database configuration copy the connection string of the database


Add sql server username and password the connection string.
From the function app open Function app setting > App service settings

In the app setting go to Application settings section and add the database connection string as below picture

Now we need to configure our Function App for entity framework. At the top right side corner click View Files and then click Add button. Add a project.json file, this file will be used for installing nuget packages.

Add below content into project.json file
{

    "frameworks": {

        "net46":{

            "dependencies": {

                "EntityFramework": "6.0.0"

            }

        }

    }

}
Keep in mind Azure Function at present support .net 4.6. Now it will automatically start download EntityFramework nuget package. You can see output in log window below.
Now go to Function app settings again and click Go to app service editor
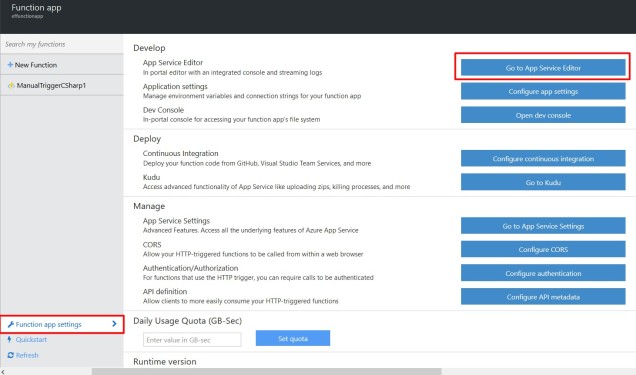
This will open whole solution in visual studio code online editor, you can now get some intelligence support and real coding experience here.
Add
#r "System.Configuration"

#r "System.Data"
into the top of run.csx file and below using directives
using System;

using System.Collections;

using System.Configuration;

using System.Collections.Generic;

using System.Data.Entity;

using System.Data.Entity.ModelConfiguration.Conventions;

using System.Data.Entity.SqlServer;

using System.Threading.Tasks;

using System.ComponentModel.DataAnnotations;
Now add data model class, I have demonstrate using simple person class at run.csx
public class Person {

    [Key]

    public int Id {get;set;}

    public string Name {get;set}

    public int Age {get;set}

}
Now we need to configure EntityFramework using code because in Azure Function App config file is not available. We only need to create a DbContext class for this
public partial class PersonDbContext : System.Data.Entity.DbContext

{
    public PersonDbContext(string cs) : base(cs){ }
    public DbSet<Person> Persons {get;set;}
    protected override void OnModelCreating(DbModelBuilder modelBuilder)
    {
        modelBuilder.Conventions.Remove<PluralizingTableNameConvention>();
    }

}
Now insert some data so check everything works. Add below code into run.csx file
using(var db = new PersonDbContext(ConfigurationManager.ConnectionStrings["sql_connection"].ConnectionString))
{
    var person = new Person
    {

        Name = "Foo",
        Age = 32

    };

    db.Persons.Add(person);

    db.SaveChanges();

}
You can find the sample code here EF with azure function
Server side logging using log4net with ASP.NET MVC
In professional Software Development logging is an important part whether it is the desktop application or web application. When we are developing a web application then we need to deploy this application on a central server and access this application throughout the whole world using the web browser. Also, we develop various web services for our data access need. In both cases, we need to develop different part, debug them test them and after deploy, we need to troubleshoot the system. For every part of this process we need to collect different information like any important information about a portion or any specific scenario, any exception happens, providing information during debugging. So logging is the solution for all of the information collection work. We can collect all of this information by logging them in a log file. In this blog post, I am going to show you how can we configure log4net logger into an ASP.NET MVC or WEB API project. I am not going more detail about log4net, you can find more about here. I will try to show you how can you configure your ASP.NET application for logging.
So let’s get started
Fire up visual studio 2013 or 2015. From the File Menu selects File > New > Project. From the new project dialog box select The Web under Visual C#. Then select ASP.NET Web Application.

Provide a name and location for your application and click Ok.
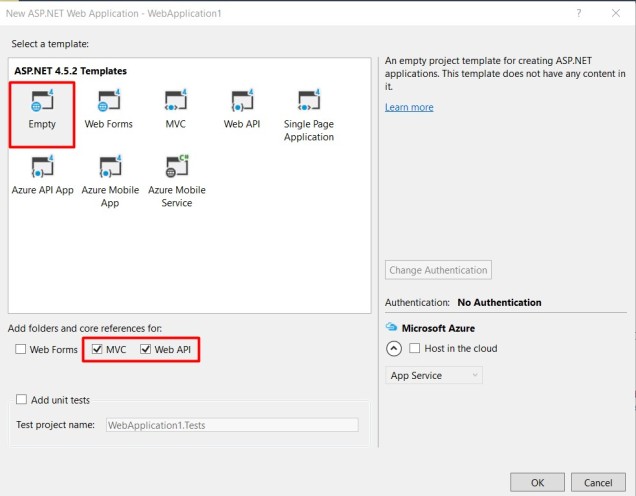
This will bring you project template selection dialog box. Select Empty as a template and mark the MVC and Web API check box. Click ok
In the Solution Explorer right-click the Controllers folder and select Add > Controller from the context menu. Select MVC Controller – Empty we will add content on this controller later.
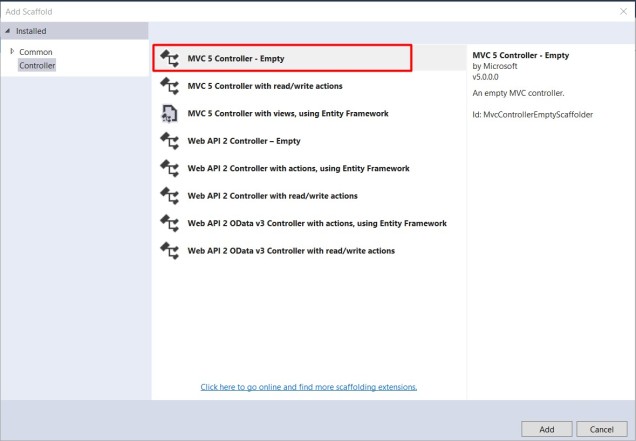
Name the controller as HomeController

Open the newly created HomeController.cs file under Controllers folder by double clicking it. Code of this file will look like below
public class HomeController : Controller
{
    public ActionResult Index()
    {
        return View();
    }
}
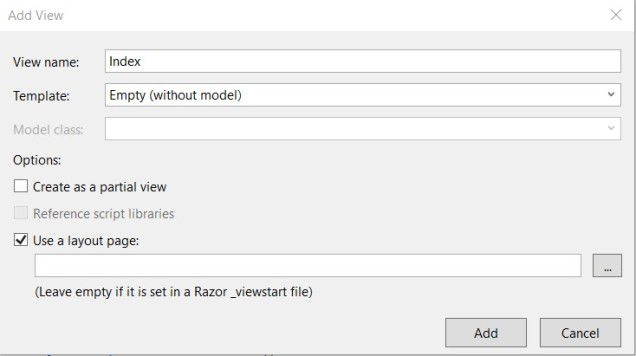
Write click on View() and from the context menu select Add View leave everything as default in the Add View window
Now we are in the main part. We need to configure this application for log4net so that we can log information as our need.
Open the nuget package manager window and search for log4net and install the package

Open up the Global.asax.cs file and add the line log4net.Config.XmlConfigurator.Configure(new FileInfo(Server.MapPath(“~/Web.config”))); into the Application_Start method.
void Application_Start(object sender, EventArgs e)
{
    // Code that runs on application startup
    AreaRegistration.RegisterAllAreas();
    GlobalConfiguration.Configure(WebApiConfig.Register);
    RouteConfig.RegisterRoutes(RouteTable.Routes);

    log4net.Config.XmlConfigurator.Configure(new FileInfo(Server.MapPath("~/Web.config")));
}
Then open AssemblyInfo.cs and add below line at the end
[assembly: log4net.Config.XmlConfigurator(ConfigFile = "Web.config", Watch = true)]
After that open Web.config file and add below content under <configuration> node
<configSections>
    <section name="log4net" type="log4net.Config.Log4NetConfigurationSectionHandler,log4net" />
</configSections>
<log4net debug="true">
  <appender name="RollingLogFileAppender" type="log4net.Appender.RollingFileAppender">
    <file value="logs\log.txt" />
    <appendToFile value="true" />
    <rollingStyle value="Size" />
    <maxSizeRollBackups value="10" />
    <maximumFileSize value="10MB" />
    <staticLogFileName value="true" />
    <layout type="log4net.Layout.PatternLayout">
      <conversionPattern value="%-5p %d %5rms %-22.22c{1} %-18.18M - %m%n" />
    </layout>
    <lockingModel type="log4net.Appender.FileAppender+MinimalLock" />
  </appender>
  <root>
    <level value="DEBUG" />
    <appender-ref ref="RollingLogFileAppender" />
  </root>
</log4net>
Here <file value=”logs\log.txt” /> is location of your log file. Now add a folder into the solution named logs.

Open the HomeController.cs file again and add logger into it.
public class HomeController : Controller
{
    private static readonly log4net.ILog Log = log4net.LogManager.GetLogger(typeof(HelloController));
    public ActionResult Index()
    {
        Log.Debug("Index method fired");
        return this.View();
   }
}
I have show here using debug log but you can log on error or only info and many more. You can find more information about it here .Now you have successfully configure ASP.Net application for sever side logging using log4net. You are free to log anything. If you run the application then you will notice there is a log file under the logs folder auto created with the log content.
